September 5, 2013

Diamond Candles (Plus a Ring!) Giveaway

Ok, so I know I've been away for a while, and tumbleweeds might as well be rolling through here, but I'm about to make it up to you right now with an awesome giveaway. Sound good?? 

One thing that I'm always buying for my home is new candles. I love being able to spruce up a room with a brand new scent, and I'm pretty sure I could spend hours sniffing my way to the perfect candle. My most recent addition to my living room however, was a step above the rest. Not only does this Diamonds Forever Orchid Meadow candle smell amazing, but it comes with a little something extra as well. Each candle contains a gorgeous ring (valued between $10 and $5,000) that is hidden within the candle, and you never know what you're going to get! The only way to find out is to light your candle and then be patient! 


After a couple weeks of burning my candle and making my living room smell great, I finally got to the exciting part and was able to remove my ring from the wax. To keep the ring safe while in the candle, it is contained in a small plastic bag and wrapped up in foil (watch this video to see how it works). So don't worry, your ring won't be dripping in candle wax when you get to it!


By this point the anticipation was pretty much killing me. You wouldn't believe the excitement that comes with unwrapping a surprise ring that you just pulled out of a candle. 


I finally unveiled this pretty little gem and was pumped to discover that it fit my finger perfectly! Luckily, Diamond Candles puts the most common ring sizes in their candles so they're likely to fit. And, if you go to their Facebook page or Instagram feed, you can check out their ring reveal photos to see all the beautiful rings that other gals have found in their candles.


Aside from the ring, another surprising thing about these candles is that they're only $25. That's a pretty good deal considering you're getting an awesome candle AND an awesome ring! There are a bunch of scents to choose from, so make sure you check out the Diamond Candles website and scoop one up!

And don't think I forgot about that giveaway ... now's your chance to win a Diamond Candle for yourself! I'm using Rafflecopter, so enter using the options below. A winner will be chosen in two weeks. Good luck!


a Rafflecopter giveaway

May 15, 2013

A Visit to the Wicked Peacock Shop

This past weekend, my sister Carolyn and I took a little trip up to Rockport, MA for the Grand Opening of Wicked Peacock, and I don't think I've ever been to a cuter boutique in my life! Having never been to Rockport before, I knew we were in for a day of fun the second we pulled into town. I felt like I was on summer vacation walking through all of the little shops by the harbor.


When Carolyn and I walked through the doors of Wicked Peacock, we already wanted to buy everything in the store. Between the unique rings, bauble necklaces, stacked bracelets, head scarfs, sunnies, graphic tanks, and adorable scarfs, we had a hard time deciding what to buy. I seriously wish I could make Wicked Peacock my own personal accessory closet!


I ended up taking home the cutest pair of bow earrings and a mint chevron scarf. Carolyn chose a cat head scarf and some amazing sunnies that she can't wait to rock on an upcoming trip to the Caribbean!


Not only were the products in the shop amazing, but the decor was gorgeous as well! Silvana, the shop owner, did a fabulous job styling her new space with the perfect combination of funky, antique, and chic pieces. I mean, take a look at this black and gold display. It totally screams "Gatsby" to me. Don't you think?


If you're in the Rockport area, or are looking for a fun place for a day trip, you seriously need to make your way to Wicked Peacock! With summer upon us, I don't think there's a more perfect time to drop in.


And, just in case you can't make it to Rockport before June, the lovely Silvana is offering a 20% discount off any online purchase just for Creative Soul Spectrum readers through the month of May. Woohoo! Just use the code CSSWP at checkout for your discount!


Many thanks to Silvana for showing Carolyn and I an amazing time during our visit!


May 8, 2013

DIY Midi Rings

Oh my gosh, I feel like I haven't posted a DIY for you guys in so long! But, today I've got a good one. Lately I've really been loving the above the knuckle / midi ring trend. Compared to the giant bauble rings that I usually wear, I find these dainty little rings to be so pretty. However, I've been having a hard time finding where to buy them. Luckily, I've just discovered that they are so easy to make yourself!


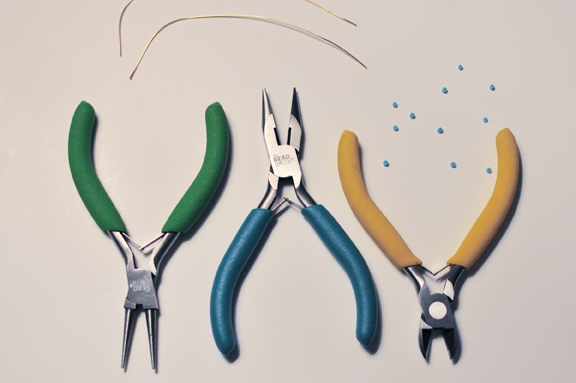
All you need is some gold jewelry wire, small beads, wire cutters, round nose pliers, chain pliers, and a cylindrical object that is about the size of your finger. It is better that your cylindrical object be a little too big than a little too small if you can't find something that is the perfect size.


Start by cutting a small piece of gold wire, and wrap it around your cylinder once. Using the round nose pliers, begin to twist the end of the wire into itself. At this point, slip a bead onto the wire at this point, then continue to twist the wire into a spiral. Repeat this process on the other end of the wire. 


Now you have a brand new midi ring! So easy, right?


If you want to make a simple stacked-style ring, start by wrapping the wire around your cylinder as many times as you would like. Snip off any excess wire with your wire cutters. Then, so the ends of the wire don't poke your finger, bend them back and squish them together with your chain pliers like I've done in the photo below.


One little spool of gold wire will make dozens of these midi rings, so get creative and try a bunch of different styles so you can mix and match them. The more midi rings the better!


March 25, 2013

Wicked Peacock Giveaway

Is there a better way to start a Monday morning than with a chance to win some jewelry? That's exactly what's going on here today. My fabulous sponsor, Wicked Peacock, is offering Creative Soul Spectrum readers the chance to win not one, but two pairs of awesome earrings! Hooray! But, before we get to that, I want to show you some of the awesome stuff that is soon to come to the WP shop.

Last week I got together with Silvana, the founder of Wicked Peacock, for a little photo shoot in Boston, where I got to wear some gorgeous pieces. This first necklace was one of my favorites. I love how funky and unique it is. Wouldn't it be the perfect addition to a spring wardrobe with that bright pop of pink? We then paired the necklace with a beaded leather bracelet and these fun gold bracelets which were just my style. 


I swapped the bold necklace for this fierce tooth necklace which I think makes a pretty bold statement itself. I seriously wouldn't mind adding this piece to my jewelry collection.


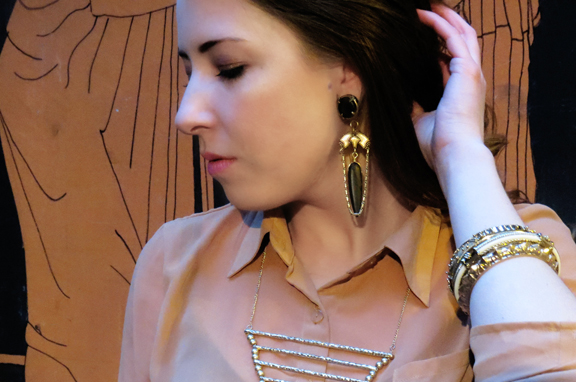
Okay, how amazing are these earrings? I felt like a queen wearing them! The black stone paired with gold makes for a stunning piece of jewelry. It was pretty hard for me to return these beauties to Silvana after the shoot was over! It's no exaggeration to say that I love all of the jewelry in the Wicked Peacock shop.


Now, let's add a little WP to your collection shall we? I'm using Rafflecopter, so entering to win these mint and black acrylic earrings is really really easy. Using the options below, the more ways you enter, the more chances you have to win. Plus you can come back and tweet about the giveaway for an additional entry every day until the contest ends. Woo! The giveaway will end on Monday April 1st, and a winner will be announced on Tuesday. Good luck!!


a Rafflecopter giveaway

February 18, 2013

New Sponsor: Wicked Peacock


I can't even begin to tell you how excited I am to be introducing you to my brand new sponsor! Wicked Peacock is an online accessories shop that is based out of Boston, but features the works of talented designers from all over! The Wicked Peacock Shop seriously has some of the most gorgeous pieces of jewelry I've ever seen! Each of the featured designers, including the founder Silvana Costa, has something unique to offer to the shop which results in a really impressive collection. 


Just to give you a little background... "Wicked Peacock started in 2009 as home accessory business, Wicked Peacock Designs, specializing in one-of-a-kind accessories made from assorted vintage findings. Silvana Costa, founder of Wicked Peacock, made all of the accessories by hand in her small studio, and took many classes to learn metal-smith techniques. Wicked Peacock Designs evolved into Wicked Peacock when Silvana realized that there were many jewelry designers who were "totally Wicked Peacock" and wanted to create a platform to showcase their work. Shortly after, Silvana assembled a great team. Marisa Camarra who coordinates most of their photoshoots for editorial content, and Becky Brackett who coordinates Social Media, industry outreach, Blogger connections and marketing." 

You can learn a little bit more about the designers and their styles on the Wicked Peacock Blog.


A couple of weeks ago, the ladies of Wicked Peacock hosted a "Wicked Favorite Things" trunk show at the Emerald Lounge (hence the dark photos and green lighting) in the Revere Hotel in Boston. I had the pleasure of attending the event, where I met the fabulous gals, Silvana and Becky. The trunk show was amazing, and I think I would have bought every single item shown if I could. I'm pretty sure I tried on all of the rings on display, and didn't want to take any of them off!


The WP accessories weren't the only things on display that night. The girls had also prepared installations of Instagram photos taken by some of Boston's favorite Bloggers. How cool is that?


Of course, I couldn't leave the event empty handed, so I scooped up an awesome pair of sunnies. And let me tell you, I'm as proud as a (wicked) peacock walking around in those babies! I absolutely love them, and I can't wait to make my next Wicked Peacock purchase. I've already got my eye on the amazing "Double Scalloped Teal Necklace" from their necklace collection. I feel like it's so unique and totally me!


It is clear that beauty isn't found only in the Wicked Peacock products, but also in the designing process, the careful selection of talented designers, and the disposition and positive attitude of the girls involved. Just by looking at the WP website, you can tell that Silvana is so passionate about what she does, and that is reflected in the amazing items we see in the shop. I'm so happy to be collaborating with Wicked Peacock, and you can look forward to seeing more of them here on the blog in the future. In the meantime, be sure to follow them on Facebook for wicked updates! 

I would love to hear what you all think of the shop! Which piece is your absolute favorite?

July 24, 2011

Skull Earrings

The earrings I made today actually started out as a bathing suit. I removed all the beads and tassels because I was using the suit itself for another project that I will be showing soon. (something to look forward to!)


I thought the beads and tassels were pretty cool on their own so i didn't want to just throw them away. And so my earring project began. The other things i needed were artists wire, earring hooks, and wire cutter. Also judging by these photos i could have used a new camera too.


First I thread the wire through the tassel.


Next I strung the skull bead onto the wire.


I looped the earring hook through the wire and wrapped the wire around the base a few times to make sure it was secure. Then I cut off the extra wire.


Repeat these steps for the second earring and that's all there is to it!


This is what they look like on... Pretty fun huh?


July 6, 2011

Eyeglass Chain

Recently, a lovely woman in my life (i won't name names) has found that reading glasses have taken a quintessential role in her accessory collection. Since a case for these reading glasses has yet to be added to the collection, I decided to do my part in making sure they were kept in a safe place; around her neck.

First step: load up on supplies. I stopped by Pflora Beads, a bomb bead store in Canton, to pick out some pretty beads, a chain, eyeglass chain loops, and pins for my project. I got a nice little lesson and some helpful tips from the owner while I was there!


I started the project by looping my first bead onto a head pin. A head pin is pretty self explanatory, it's a pin with a head on one end to keep the bead in place one you slip it on. Once the bead was in place I made a loop in the pin.


Next step: I looped the pin through a link in the chain.


You can add more than one bead to the pin.


I also made some pieces with multiple beads and separators.


After the beads were in place and the pin was looped through the chain, I wrapped the wire of the pin around itself while trying to keep the spiral form as tight as possible.


After that I cut off the extra bit of wire using jewelry wire cutters.


I continued this process repeatedly until I finished my pattern of beads.


For a bit of extra fun I decided to make a little somethin somethin on which to display the final product.


I used some pretty sophisticated materials for this: glue stick, cardboard, paper


This eyeglass chain is ready to aid in some serious reading!