February 26, 2014

Kelly's Colorful Baby Shower

I'm so excited to finally be sharing some big, huge, exciting news here today! This April, my sister Kelly is having a baby! Kelly and her husband Joe are going to be a Mom and Dad for the first time which means I'm going to be an auntie for the very first time too! My siblings, parents, and I are all jumping out of our skin with excitement to meet this little one, and April can't come soon enough! What's making the anticipation even greater, is that we don't know whether we'll be meeting a little boy or a little girl. Whichever it is, I can't wait!

A few weeks ago we threw Kelly a colorful-themed baby shower. Since we don't know the gender of the baby, we didn't want to go too pink or too blue, so we decided multicolor decorations would be fun. Before the shower, we had a craft night with the future aunties and future grandmothers and made one of my favorite craft projects for the occasion. Using this tutorial from Shoes Off Please, we made an adorable fringe tassel garland out of tissue paper that served as a backdrop for the gift opening. 

One of my biggest contributions to the shower was the baking of the cakes and cupcakes. Serving 80 guests was a tall order, but 14 layers for 3 colorful cakes, and 30 cupcakes later, I was really happy with how they turned out! I chose to frost the cakes with homemade white buttercream frosting so that the colorful layers inside would be a surprise. Each cake was decorated with a garland of giant pom poms and the cupcakes with mini pom poms that resembled something out of a Dr. Seuss book. Cute, right?


I really loved the favors that we offered all the guests at the shower. My mother made batches upon batches of marshmallow popcorn balls that we added a pop stick to and packaged in cellophane bags wrapped with colorful craft tape. I designed circle tags that read "Ready to Pop!" that I cut out with the amazing 1.5" circle punch tool I got from Michael's, and we stuck a tag on each popcorn pop. They were cute and delicious! 

As an activity at the shower, each guest received a Baby Prediction card where they made guesses about the baby's gender, weight, birth date, etc... and also offered advice for the parents and well wishes for the baby. After the cards were filled out, guests hung them on a string with baby clothespins, using a blue pin if they had guessed "boy" and a pink pin if they had guessed "girl". At the end of the shower it seemed to be pretty 50/50 between boy and girl predictions! Kelly and Joe were blessed to have received so many amazing gifts for their new baby at the shower, and everyone had a really great time. 

And now for some more fun news! After a long break, I've decided to dust off the ole Etsy shop and I'm now offering these prints there. If you are planning a baby shower, these prints would make the perfect addition to the special occasion! I'm also offering an 8x10 art print of a baby and mommy giraffe that would totally look adorable in any nursery. So head on over to my shop and check them out! Hooray for babies!!

February 19, 2014

DIY Gold Vase

I've had this DIY up my sleeve for a little while now, but have been waiting for the perfect opportunity to share it. That opportunity came in the form of the pretty bouquet of flowers that I picked up at the Local Love market last weekend. After all, a vase (even a gold one), isn't as nice to look at when it's not filled up with flowers. 


Before getting the midas touch, this vase was actually a pasta sauce jar. When I had finished using the jar, I thought it was too pretty to get rid of it. So now we have this easy DIY.

You'll need a jar, metallic gold spray paint, frog tape, newspaper, and Goo Gone. If there is a label on your jar, you can remove it by soaking the jar in warm water and then using the Goo Gone to remove any extra glue residue. Make sure the jar is completely dry before moving on to the next step.

Wrap  frog tape around your jar wherever you don't want paint. I just did one thick stripe towards the top of the vase.


You want to make sure that no spray paint will get inside of your vase, so use frog tape to cover the inside edges  and then stuff the jar with newspaper. Spray the jar with 2 coats of spray paint, allowing time to dry between each coat.


When the paint is completely dry (follow drying instructions on spray paint can) remove the newspaper and frog tape from the jar. Your glass jar is now an adorable gold vase!


I'm going to be keeping my new vase at work since I spend most of my time here and want to actually be able to see my flowers. My pretty valentine flowers have been brightening up my desk this week, and with spring right around the corner I'm hoping to keep this vase filled!


December 11, 2013

DIY Pinecone Mobile


Happy Wednesday friends! This week, my blogger pal Amanda of Prim and Propah is hosting a series of guest posts and giveaways on her blog. Last year I did a guest post on a DIY infinity scarf, so when Amanda asked me to participate again this year, I was happy to! Like you guys, Amanda's readers love a good DIY, so I created one just for the occasion. But, since I didn't want any of you to miss out on it, I'm posting it here too. Make sure you head over to Prim and Propah to enter her amazing giveaways this week (today's involves some gorgeous sunnies!) and check out all the other guest posts! 

This DIY involves my favorite thing: gold spray paint. Seriously, once I purchase a can of gold spray paint, nothing in my house is safe. This time, pine cones were on the receiving end of my obsession. I wanted to make a holiday decoration that was a little out of the ordinary, so along with the gold spray paint and pine cones, I used twine, white spray point, frog tape, and a branch to make a pinecone mobile. 


Instead of hunting down 5 perfect pinecones, I opted to buy the scented ones from Michael's instead. The branch, however, came right from my backyard. Woo nature! So first things first: spray paint everything white. This is going to take a little bit of time since the pinecones have a lot of nooks and crannies, and you'll need to apply a few coats of paint to make sure they're all covered. 


Once the white spray paint is completely dried, use frog tape to cover the areas of your pinecones and branch that you'll want to be gold. I chose to keep the tops of the small pinecones white, and make the tops of the bigger pinecones gold.


Now, apply a couple of coats of gold spray paint (I used Krylon metallic gold). Your pinecones should be looking pretty fancy now!


When everything is completely dry, tie the pine cones to your branch using twine. Then tie a piece of twine to the branch so that you can hang it up. And now you're done! Doesn't everything look better with a little bit of gold?


August 7, 2013

DIY Folding Chair & Bench Reupholster Makeover

I'm so pumped I can finally share this fun furniture reupholster DIY with all of you! The final products have been sprucing up my room for weeks and I just can't keep them to myself anymore. This is actually a 2 part DIY, so you may be inspired by one or the other, or both. For me, the first part was inspired by a chair DIY that I spotted on Pinterest that I immediately knew I wanted to try myself. The second part just seemed like an obvious choice for a followup project.

I've had these old chairs taking up space on my front porch since the day I moved into my apartment. They've never been used, as they look far from inviting. Considering the chairs were over 10 years old (one of them still had its Ames price sticker on it) I'm not surprised that they were a bit beat up. 


I ended up only reupholstering one of the chairs because the screws on the other were stripped beyond repair. But that was ok with me because it paved the way for part 2 of the project. Before beginning the makeover process, I made sure to clean the chair from head to toe. I removed the seat from the frame first to make it easier to clean. My chair also had a back cushion, but because it wasn't attached by screws I just had to rip it off. Then, I gave the frame a new look by spraying it with a couple of coats of Krylon - Catalina Mist spray paint and left it to dry.


While the frame was drying, I got to work on the reupholstering. The seat cushion wasn't really in the worst shape, so I decided to keep it. I removed the old fabric from the seat and replaced it with new fabric. To do this, just stretch the new fabric over the cushion and fold it under itself along the edges for a clean look. Using a staple gun, staple the fabric to the bottom of the seat. Start stapling at the center of each side and work your way out to the corners.


I thought it might be tricky to attach the fabric with the staple gun to the back cushion because of the shape, but it ended up being just as easy as the straight edged seat. After the paint had dried on the chair frame, it was time to put the cushions back in place. I attached the back cushion to the chair using E600 industrial strength glue and let it set for 48 hours.


The seat cushion was easy to put back in place, as it just required a couple of screws. At this point I was bummed that I wasn't going to be able to have a matching chair set since I wasn't able to makeover my second chair. I decided that I needed to give this chair a matching piece of some sort so I moved along to Part 2...


I've had this little bench for years and years. I love it because it appears simple, but if you look closely, all 4 of it's legs are different. I feel like that unique flair is just my style! It used to be my piano bench way back when, but has since just been a place to stack books and papers. It clearly needed a makeover as well.


First things first, since the bench was black I had to prime it before spray painting it. After it was primed, I finished it with the same mint color I had used for the chair.


Since this bench never had a cushion before, I went out and bought cushion foam for it from Joann Fabrics. I stapled the edges of the foam to the top of the bench so that it would stay in place once I attached the fabric on top. The fabric was stapled the same way as it was on the seat - starting in the center and working my way out to the corners.


I decided to get rid of my bulky office furniture and replace it with these new pieces, and I'm loving my work space so much more now! It's way more fun doing work when you're surrounded by funky colors and patterns!


June 26, 2013

DIY Chalkboard Garden Markers

I am so glad that summer is officially here! Are you growing a summer vegetable garden this year? I've always wanted to, but have never quite gotten around to doing so. Plus, I've always found it to be a little intimidating, especially after a few failed attempts at spring flower gardening. My mother, however, has recently planted a veggie garden in her yard, and it's growing! I wanted to offer some help in the garden, but since I'm lacking a green thumb, I turned to what I know best; a DIY project.


These chalkboard markers are a great way to spice up any garden, and they're easy to make. All you need are some 2 inch wide wood pieces (I got these at Michaels), chalkboard spray paint, white paint, and clear polyurethane wood finish spray paint. Start by spraying a coat of chalkboard spray paint on each of the wood pieces. Once dry, flip them over and spray the other side. Then, repeat this process with a second coat of spray paint.


Rather than using actual chalk to write the names of the vegetables on the markers, use white paint so that it won't wash off when you water your garden or when it rains. Once the paint dries, apply a coat of the clear polyurethane wood finish spray paint to protect the markers from the outdoor elements.


I decided to make a little sign for my mother's garden as well, using lyrics from a favorite childhood song. I took a small painting that I had gotten from a yard sale, sprayed chalkboard paint over the painting, then screwed a blank marker to the back. I applied a coat of the clear spray paint to the final product.


My mother's garden is looking better than ever with her new garden markers, and I can't wait to see how it will look once all the veggies grow!


May 8, 2013

DIY Midi Rings

Oh my gosh, I feel like I haven't posted a DIY for you guys in so long! But, today I've got a good one. Lately I've really been loving the above the knuckle / midi ring trend. Compared to the giant bauble rings that I usually wear, I find these dainty little rings to be so pretty. However, I've been having a hard time finding where to buy them. Luckily, I've just discovered that they are so easy to make yourself!


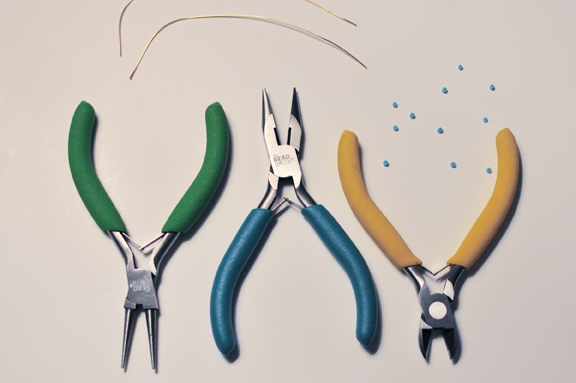
All you need is some gold jewelry wire, small beads, wire cutters, round nose pliers, chain pliers, and a cylindrical object that is about the size of your finger. It is better that your cylindrical object be a little too big than a little too small if you can't find something that is the perfect size.


Start by cutting a small piece of gold wire, and wrap it around your cylinder once. Using the round nose pliers, begin to twist the end of the wire into itself. At this point, slip a bead onto the wire at this point, then continue to twist the wire into a spiral. Repeat this process on the other end of the wire. 


Now you have a brand new midi ring! So easy, right?


If you want to make a simple stacked-style ring, start by wrapping the wire around your cylinder as many times as you would like. Snip off any excess wire with your wire cutters. Then, so the ends of the wire don't poke your finger, bend them back and squish them together with your chain pliers like I've done in the photo below.


One little spool of gold wire will make dozens of these midi rings, so get creative and try a bunch of different styles so you can mix and match them. The more midi rings the better!


February 21, 2013

DIY Gold Elephant Magnets

Remember back in November when I did the DIY Elephant Key Hook tutorial, and I promised that in the future I would share what I did with the other halves of my elephants? Well, the future is now! I decided to turn these little elephant butts into magnets for my fridge, and it only took me 2 minutes to do it (since I already had them cut and spray painted from the first half of the project). 

You will need:  toy elephants // gold spray paint // round magnets (i found these at Staples) // gorilla glue


If you're starting this project from scratch, go back to the first half of my tutorial for cutting and spray painting instructions. Once the back half of your elephant is cut, spray painted, and dry, apply gorilla glue to your round magnet and press your elephant piece onto it. Hold it tightly in place for 30 seconds until the glue is set. I let my magnets sit for another hour before using them, just in case.


Once they're ready, just stick the magnets to your fridge (or other magnetic surface) and now it will look like you have a stampede of elephants trying to get into your refrigerator!


As a bonus, the little tails are perfect for hanging light things like wine glass charms or bottle openers. No ifs, ands, or elephant butts about it, these magnets make for an adorable accessory for your refrigerator!